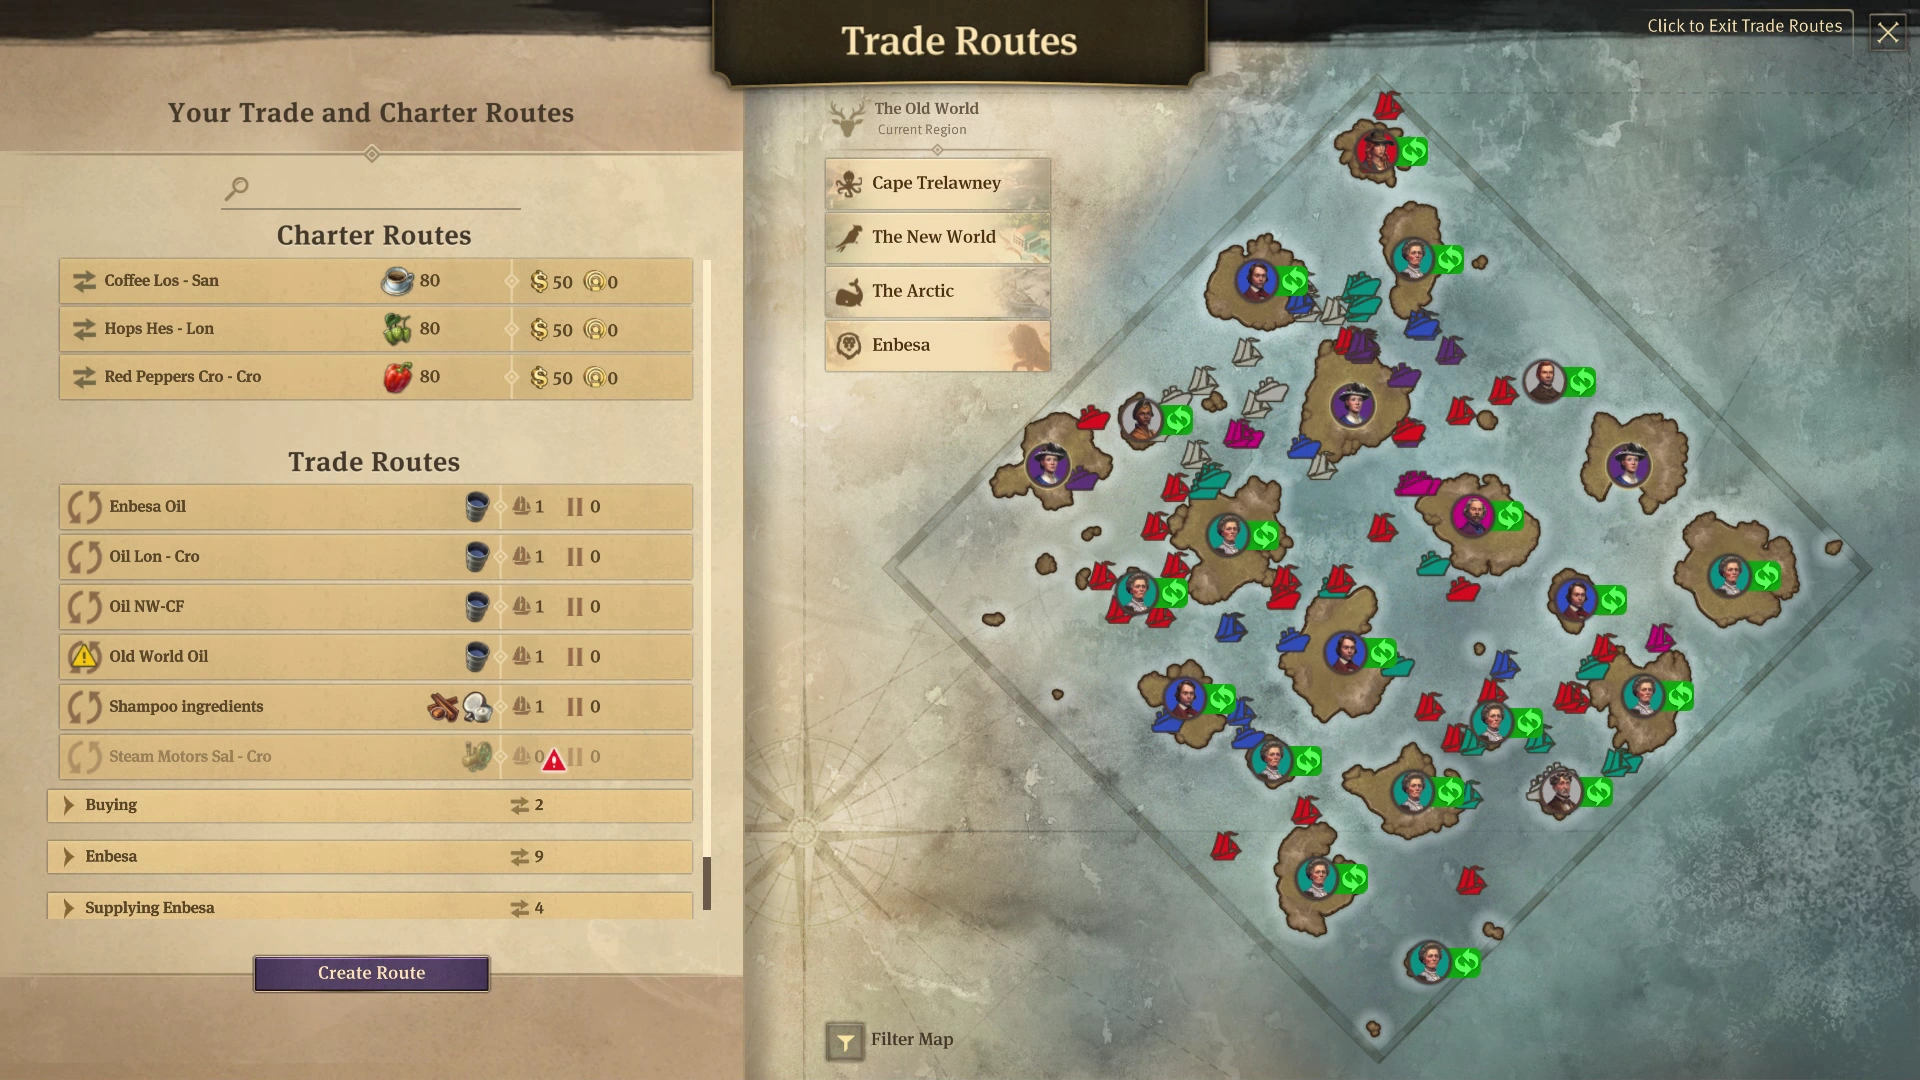
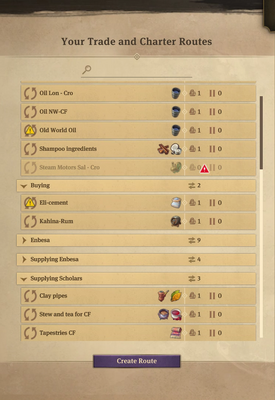
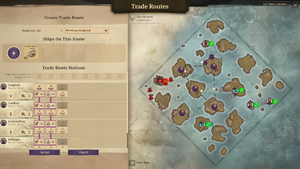
The trade route menu – the list of routes on the left and region map on the right.
A single island on its own cannot provide everything that your growing population needs. Multiple islands are eventually required to establish a thriving company. Having multiple islands means that you need to transport goods between them. You can do that manually by loading goods on ships, sailing to another island and unloading goods there. Alternatively, you can set up ship routes which let you do that automatically and continuously. Route's ships constantly travel between assigned islands transporting desired goods. There are three types of routes: trade routes, charter routes and oil routes.
There are several ways of accessing the routes menu:
- Clicking on the routes button in the bottom left part of the screen, below the minimap. The button has a ship symbol with one arrow above and one below the ship.
- Using the keyboard shortcut: T.
- From any ship's menu by clicking on the button with two curved arrows aligned in a circle.
- From statistics menu when only one island is selected, the storage tab and then trade route tab – by clicking on the 'go to location' button on the right from the route's name – it opens the view of that specific route within the routes menu.
Region map[]

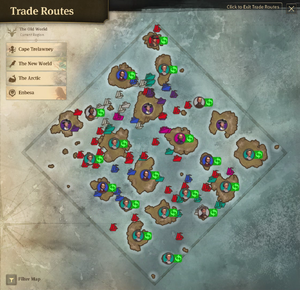
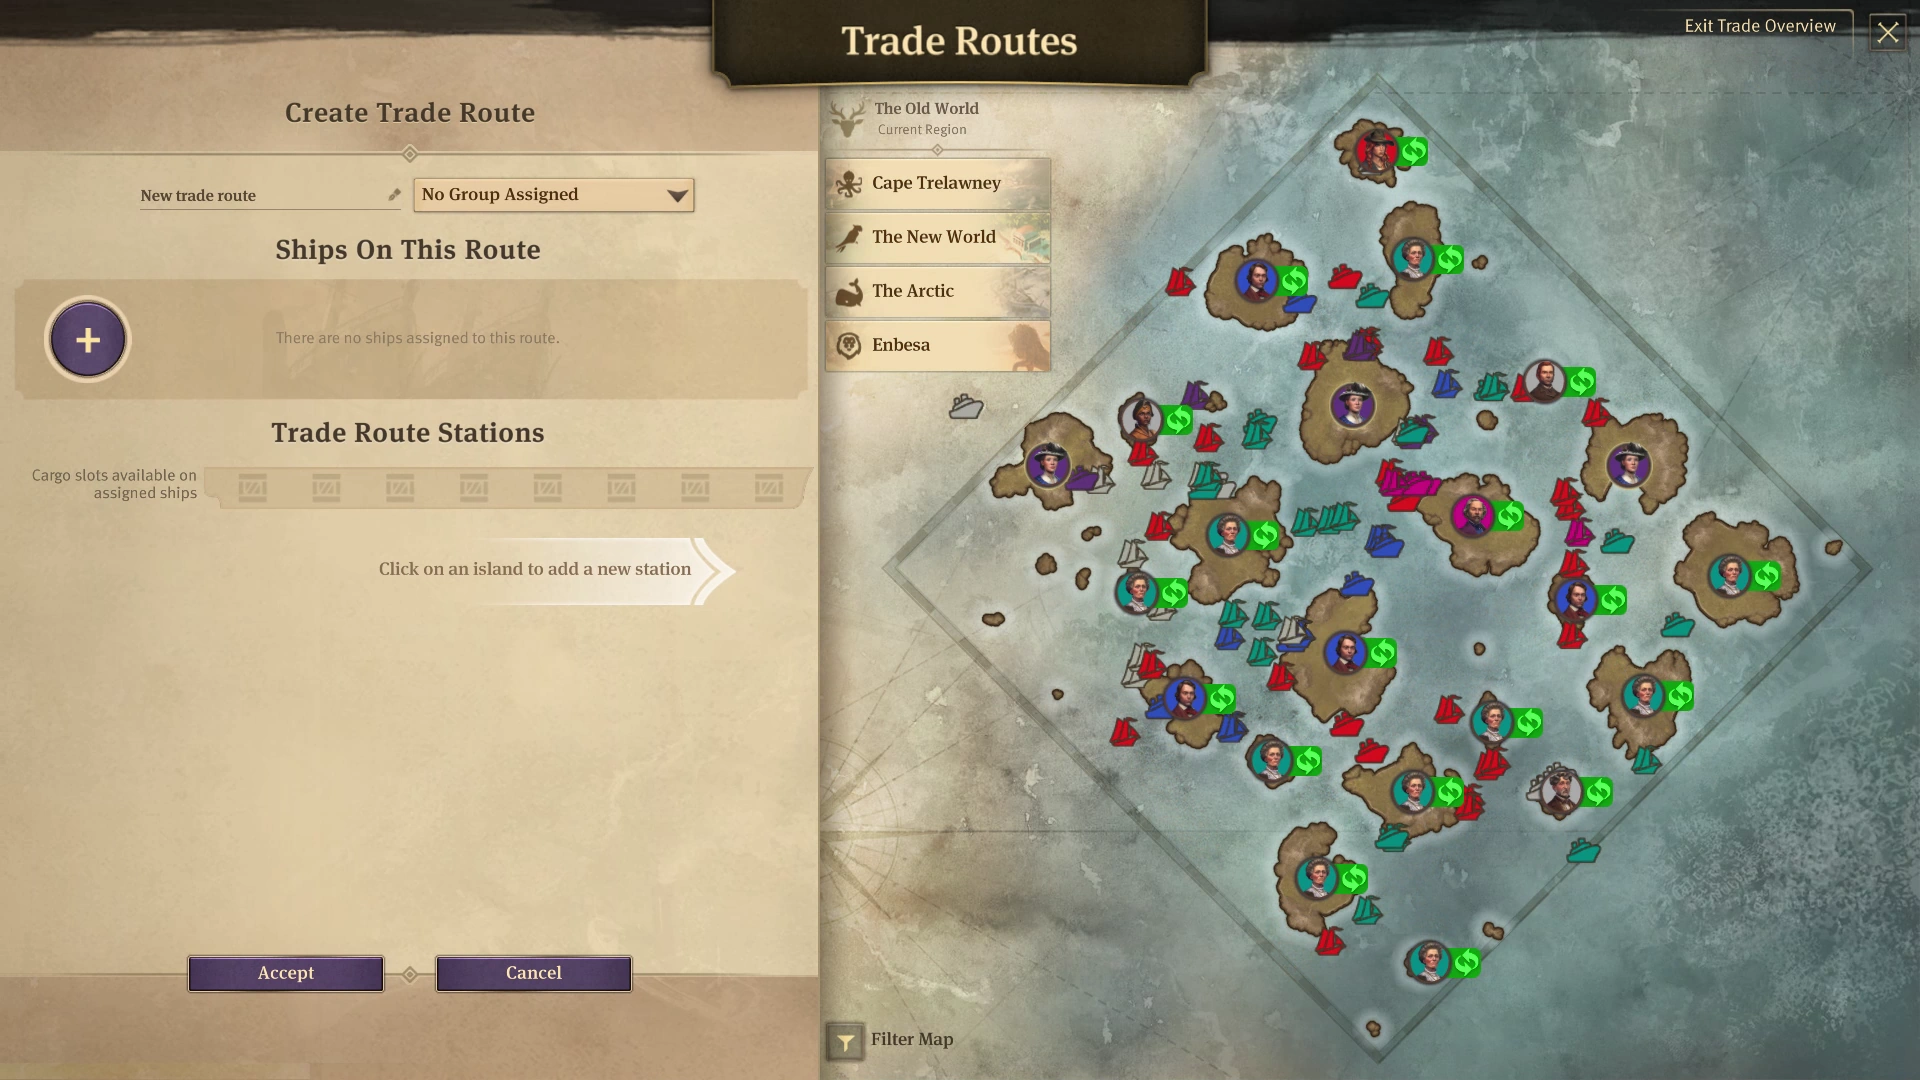
The map of the current region which is on the right side of the trade routes menu. It allows to switch between different regions in the top left. The map provides a decent overview over the region, its islands, ships and trade routes.
The right part of the routes menu is a big map of the current region. Using buttons at the top left corner of the map you can switch between which region is visible. The map shows all islands and all ships, including those which belong to other players and characters.
When an island belongs to one of the players or characters, it is indicated by a circle on top of the island. The circle includes the character's portrait and has a background of appropriate colour: players and opponents – unique individual colour, neutral traders – gray, pirates – red. If you can trade with a character, the circles on top of their islands have a trade symbol on their right, if you are at war with them, there will be a two crossed swords symbol. You can hover over any of the islands to see some details about it. The top of the appearing infotip indicates the name of the island and who is its owner. The rest of the infotip depends on who the island belongs to. If it is unclaimed or you are the owner, it will show what type of fertilities and raw materials are available on the island. If it is owned by a party you can trade with, it will display all trade requests and offers available on the island, including number of tons that is being requested or offered.
The ships on the map can be differentiated by their symbol: its shape and colour. The shape indicates if it is a sailing ship, steam ship, airship, while the colour determines to whom the ship belongs (players and opponents – unique individual colour, neutral traders – gray, pirates – red). Hover over a ship to see its name and type. If it belongs to you, you can also see its cargo and items. You can click on the ship on the map while holding Ctrl key in order to jump to its location in the world. It is possible to filter which ships are visible on the map. In the bottom left corner you can click on the filter map button which opens a submenu with filtering options. Select or deselect a filter to show or hide the ships belonging to specific characters, traders or pirates.
When hovering over a good in the route's menu either in the cargo slots or the good selection submenu, the current stock and trend of the good is displayed above your portrait on top of your islands on the map. The number indicates number of tons in storage of the island, the arrow on the right indicates the trend – whether the stock has been increasing, decreasing or has been roughly the same during the last several minutes.
When you hover over a specific route or a route is selected, the map also shows details about the route. The islands involved in the route are marked on the map by a number at the bottom right corner of the portrait. The number indicates the position of the island within the route's island list. All islands on the map are connected showing the shortest path which each ship tries to stick to. Each path contains a waypoint pin, or entry to the region pin, which placement can be adjusted to change the ship's pathing. It is useful in times of war, to adjust the paths of your trade routes to avoid sailing close to your enemies' ships or islands.
")
")
")
")
")
")
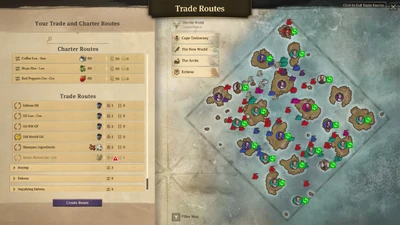
Managing the list of routes[]
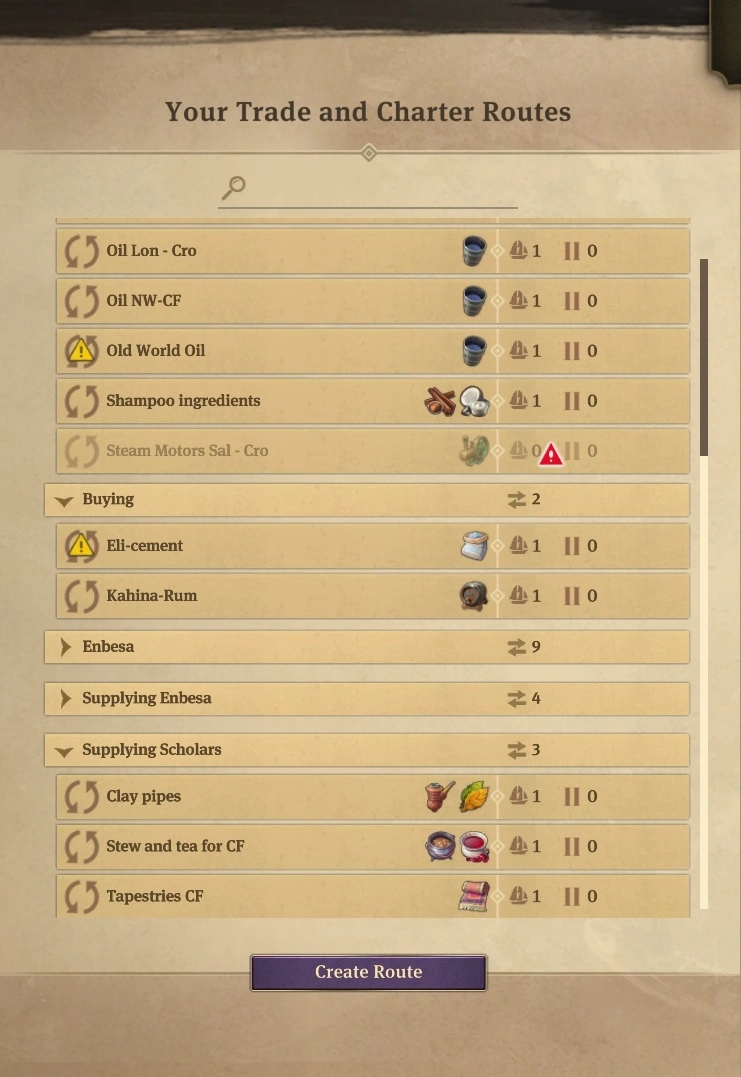
The list of routes scrolled down to the bottom. Some routes belong to groups, some of which have their routes lists expanded, some are hidden. Grouping and properly naming routes can help with their management.
You can have control over many islands and produce many different goods. Transporting them between all those islands might require establishing a lot of trade routes. Some of them have to be adjusted a long time after they have been created, therefore it is important to easily find and access any route you have. Good management of the list of routes can save a lot of time and effort required to update the broad transport network. There are a few options the game offers to help with this task: naming every route, combining routes into groups, using search function to find a specific route, jumping to a route view from a ship's or statistics menus.
First, it is worth to mention that routes in the routes menu are divided into two sections: charter routes at the top and trade routes below them. The trade routes section contains trade routes and oil routes together. Groups of routes can be created within each section, there can be ungrouped routes too. At the top of a section there are routes which do not belong to any group, they are listed in alphabetical order. Then there are groups of routes, with their routes either expanded or hidden, the groups and routes within each group are also listed in alphabetical order using their names.
Every route has its name, either created by the player or automatically by the game. The default names consist of the name of the main or first good in the route, then space, first three letters of the first island, space, a dash, space, first three letters of the last island of the route. For example a route which transports red peppers from London to Crown Falls would have a default name 'Red Peppers Lon – Cro'. To name a route differently, open the route's menu (either via creating a new route or by selecting an already existing route) and then use the text field at the top left part of the menu. Replace the old name of the route with a new name and click Accept button at the bottom.
Routes can be grouped together to make it easier to find and track routes which have something in common. The grouping is entirely up to the player, the game does not group any routes automatically, except for separating charter routes from other types of routes. When creating a new route, it can be added to a new or existing group by selecting an appropriate option from a dropdown menu at the top of the route's menu. Every route can belong only to one group at a time. A group can also be created from the overview of all routes by clicking on the far right part of the group header and choosing create new group option. From the same menu a group can also be deleted or renamed. Deleting a group does not delete its routes, only leaves them without any group. Clicking on the far right part of the route's record in the general overview opens a dropdown menu which contains options allowing to put the route into a new group or move it to an existing group.
Search function at the top of the routes overview allows to enter various keywords to filter the list of groups and routes. Only routes which are relevant will be listed in the overview, the rest will be completely hidden. Words you can use in the search filter include names of islands, goods, name of ships, types of ships.
If you notice any problems with a particular ship which is on one of the trade routes, you can easily jump to a specific trade route's menu from the ship's menu by clicking on the button with two curved arrows aligned in a circle. If you notice problems with the amounts of a specific good which is being transported via trade routes, you can quickly access the trade route's menu from the storage tab of statistics menu. Select only one specific island, go to the trade route tab and click on the 'go to location' button on the right from the route's name.
")
")
")
General routes mechanics[]
Once a route is set up, every ship assigned to the route follows the orders independently and starts from its first island, loads/unloads ordered goods, travels to the second island, loads/unloads goods, travels to the next island etc. After reaching the last island, a ship travels back to the first island and starts the same route again. Ships on routes continuously transport goods until they get paused or unassigned from the route, or until the route is deleted, or the ship gets destroyed.
Ships, except oil tankers, have to stop at load/unload buildings - they are specific harbour buildings which ships have to use to load or unload goods: trading posts and piers (including advanced piers and docklands pier modules). A ship travels towards an appropriate building, adjusts its position and then proceeds to load/unload goods. This process takes time, based on the loading speed of the building and any items affecting the building and the ship, though the process always has to last at least 5 seconds (unless no goods get loaded or unloaded, then ships leave immediately). The goods get loaded/unloaded as soon as the ship stops at the building, only after the loading time has passed, the ship leaves and starts moving towards its next destination. During the loading/unloading process, the building is occupied and cannot be accessed by other ships (however, airships are an exception and each building can be used by one airship and one ship of other type at the same time). If there are not enough load/unload buildings, ships arriving at the island will wait until one of the buildings becomes free. They never skip a station, they will wait in a queue for as long as it is necessary, ships move onto the next island only after docking and loading/unloading their goods at the previous island.
Trade routes[]
Trade routes are routes which use your own ships to transport goods between your islands or to automatically trade with islands of other players and characters. Each route can connect multiple islands, can transport several types of goods and use multiple ships. Goods are managed on trade routes via ships' cargo slots. Each column where goods can be selected to be loaded/unloaded represents one cargo slot. Because a ship's cargo slot can hold only one type of goods at a time, on a single island only one good can be selected to be loaded into a single cargo slot. Only one good can also be selected for the unload order. It is possible to transport several goods using only one cargo slot but the trade route's orders have to be properly adjusted, for example by loading different goods on different islands, making sure one good is fully unloaded before another good is supposed to be loaded (for example via wait to unload or discard cargo options).
The route can make use of only as many cargo slots (columns in the menu) as the assigned ships have. If only a clipper is assigned to a route, only 4 slots/columns can be used, as that is how many cargo slots clippers have. If more slots have their goods assigned in the route menu, the game will display a warning about this, and the goods from the columns after the 4th one will never get loaded or unloaded on that route. If a clipper and a schooner were assigned to such a route, a clipper will follow the orders contained in the first 4 columns, while the schooner will follow the orders from the first 2 columns.
Special options[]
There are three special options available which change behaviour of the ships on trade routes. They are set separately for every single station on a route. Each of those options is applied for all goods that are being handled on a station. Those options are:
- Wait for goods – the ship will wait until it has loaded all goods for this station.
- Discard cargo – goods that cannot be unloaded will be thrown overboard to make space for other goods. Mutually exclusive with wait to unload.
- Wait to unload – the ship will wait until it has completed all unload orders for this harbour. Mutually exclusive with discard cargo.
At the stations which use the options to wait to load or unload goods, the ships are occupying a trading post or a pier for the whole duration of their waiting time. Only once the goods are fully loaded/unloaded, the ships leave the trading post or pier and travel to the next station. Those orders are applied for all goods, so for example if a ship is supposed to load 50 tons of grain and 50 tons of wood, it will leave only once both goods are fully loaded. Even if 50 tons of grain have been loaded but less than 50 tons of wood, the ship would still be waiting for more wood. At stations where discard cargo is active, the ships drop the cargo from those cargo slots which are used to load new goods at that station. For example if a schooner has 50 tons of wood in each of its cargo slots (100 tons of wood in total) and it is ordered to load 50 tons of grain into its first cargo slot at a station with discard cargo active, the 50 tons of wood from the first slot gets thrown overboard into the sea and grain gets loaded into this slot instead.
Those special options should typically be used only when the same slot is being used for several types of goods within one trade route. Wait for goods and wait to unload options make ships wait at trading posts and piers, which means that using those options require paying careful attention to how many ships can load/unload goods at the island at the same time. If there are no piers and only the trading post and a ship on a route waits for goods to load, any other ships which want to load/unload goods have to form a queue and wait until the route's ships finishes loading all goods. Therefore using those two options should be limited only to those islands which have many piers for ships to use. Discard cargo option allows to better utilise each ship and lowers the number of trade routes that have to be created. However, if the discarded goods are not picked up manually, they will be lost and it results in wasting some of your resources. Therefore it may be important to consider if the goods that would be discarded are indeed cheap or easily expendable.
Creating trade routes[]
The routes menu after selecting to create a new trade route. The region map allows to add islands to the route, while the left side of the menu allows to name the route, assign it to a group, assign ships or choose goods to transport (once the stations are chosen).
- Open the trade routes menu.
- Click the create route button at the bottom, then select trade route type.
- Click on islands on the region map on the right to select them and involve them in the trade route. If necessary, switch between regions using the buttons at the top left part of the map.
- Select which goods should be loaded and unloaded at each station, and adjust the quantities. You can also decide to use the special options, for each station separately.
- Choose which ships should be assigned to the route.
- Change the name of the route and assign it to a group, if you want.
- Click on the accept button at the bottom to finalise the route.
Islands selection
Selecting islands for the trade routes is possible only via the region map on the right by clicking on appropriate islands. You can change the order of islands in the route by clicking on arrows which appear when you hover over left part of the station's record in the trade route stations section of the menu. In that same area there is also the delete button which you can use to remove a station from the trade route.
You cannot select which load/unload building a route is going to use. You can select only the islands and the system dynamically selects which building a ship is going to use. It seems to be based mostly on the distance the ship has to travel or availability of the load/unload buildings.
Goods selection
Clicking on the load good button opens up a small menu where you can select which good should be loaded into a specific cargo slot at a specific island. The list of goods to choose from can be filtered in two ways: by the type of good and by the region it can originate from. You can use one of the filtering options, or both at the same time, to make it easier to find the goods you want to load. Click on the good from the list to select it for loading.
Click on an unload good button within the column to automatically order the route to unload the same good as the previous load order within the same cargo slot. Once a good is selected for loading or unloading, you can click on it to change the amount to load/unload. Right-click on a good to remove it from the slot. To save time and copy the configuration of one slot into more slots, you can left-click on the load/unload order while holding Ctrl, and it will be automatically applied to the next cargo slots. If no ships are assigned, the configuration will be introduced to all 8 slots. If ships are already assigned, it will be copied only to that many slots as required to meet the number of cargo slots of the assigned ships.
Ships selection
Clicking on the plus button in the ships section opens up a small menu where you can select which ship to assign to the route. Each record presents one ship and details about it: the ship type represented by its icon on the left, the name at the top, cargo and items on board in the middle, and the location of the ship indicated by the icon in top right. At the top of the menu you can switch between what kind of list of ships you want to choose from: available ships, all ships, idle ships, or ships in the current region. To assign a ship to the route, simply left-click on the record of the ship in this menu.
You can jump to the location of a trade route's ship from the trade route menu. After opening a specific route's menu, left-click on an assigned ship while holding Ctrl key. The trade route menu then closes and the game will center the camera on the ship you clicked.
")
")
")
")
")
Oil routes[]
Oil routes are essentially a type of trade route, they use your own ships, can service multiple islands and include multiple ships. Everything that has been said above about trade routes also applies to oil routes with only a few exceptions. The difference is that oil routes are used specifically to transport oil, it is the only good they can transport and the only one which can be selected in the menu. Oil routes can include only oil tankers as it is the only type of ships that is capable of storing and transporting oil. The only islands that can be involved are islands owned by the player which have an oil harbour constructed. Oil tankers can load/unload oil only at oil harbours, they cannot use any trading posts or piers.
Charter routes[]
Charter routes are routes which hire schooners from an unknown party instead of using ships which you can build and own yourself. They can transport only up to 80 tons of one type of good. They can involve only two islands which belong to the player and they transport goods in only one way, from the first island to the second island of the route. Every charter route has a maintenance cost of 50 coins per minute. Additionally, each route requires 5 influence points, except for the first three charter routes, which are free of any influence cost.
When a charter route is created, a hired ship appears beyond the region's borders but is visible on the minimap. It travels towards the first island of the route, loads ordered goods, travels to the second island, unloads goods. Then the ship travels to the first island again and starts going back and forth between the two islands, transporting assigned goods.
Despite the ships being chartered and not technically owned by the player, they will still be targeted by your enemies and can be destroyed. When the ship gets destroyed, the goods it had on board are dropped into the sea, and a new hired ship appears beyond the region's borders and starts following the route's orders.
Creating charter routes[]

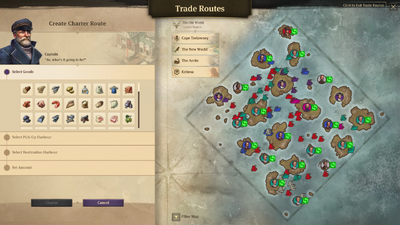
The routes menu after selecting to create a new charter route. The region map allows to add islands to the route, while the left side of the menu allows to choose the type and set the amount of the good to transport.
- Open the trade routes menu.
- Click the create route button at the bottom, then select charter route type.
- Select which good you want to transport.
- Click on islands on the region map on the right to select them and involve them in the trade route, first the pick-up island, then the destination island. If necessary, switch between regions using the buttons at the top left part of the map.
- Set the amount of goods to be transported.
- Click on the charter button at the bottom to finalise the route.
Trade route or charter route?[]
When transporting any kind of goods except oil, you can choose between trade routes or charter routes. Both have their advantages and disadvantages and there are situations when one type is better than the other. The biggest disadvantage of charter routes is their high influence cost, which in the long run means that charter routes should be used only in specific cases. The table below presents a brief comparison between the trade routes and charter routes in general.
| Trade route | Charter route | |
|---|---|---|
| Ships used | player's own ships | hired ships |
| Number of islands serviced | multiple | only 2 |
| Number of cargo slots | 1 to 8, each up to 50 tons | 1, up to 80 tons |
| Maintenance cost | ships' maintenance cost | 50 |
| Influence cost | cost of all selected ships | 5 |
To properly compare the charter routes and trade routes, however, it would be better to compare a charter route to a trade route which transports a single good, between only two islands, and uses a schooner. Such a trade route could transport up to 100 tons of goods, and would cost 15 coins per minute, requiring 1 influence point. It would also involve an initial investment with regards to constructing a schooner: maintaining a sailing shipyard, construction materials for a schooner etc. Charter route could transport up to 80 tons of goods but would cost 50 coins per minute and require 5 influence points. In this case, however, there would be no initial investment of resources into building any ships. Comparing all those properties, it is clear that in the long run trade routes which use schooners cost less than charter routes.
In general, trade routes should be used whenever it is possible, while the use of charter routes should be limited. The investment into ships usually pays off eventually. However, due to the fact that first 3 charter routes have no influence cost, it is recommended to establish 3 charter routes anyway, in order to decrease the use of influence overall. Beyond always using 3 of them, charter routes might be a better option in some specific situations such as:
- When a route is supposed to be only temporary and it does not make much sense to construct a schooner which would be used only for a short time.
- When for some reason it is impossible or very difficult to construct your own ships, for example when an island is under heavy attack. Another example is a situation during very early stages of the game, when you already have more than one island but building your own ships would use up precious resources and unnecessarily slow down your expansion.
Minimum stock[]
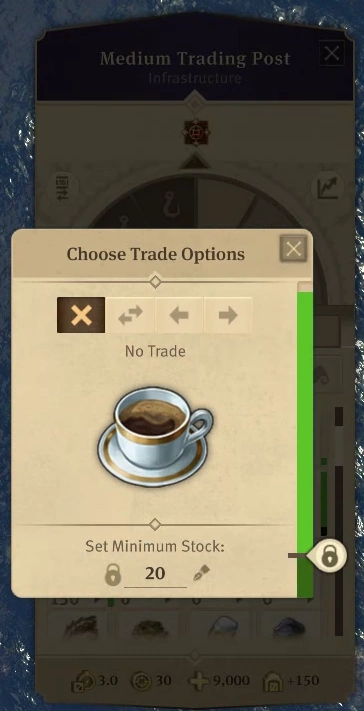

The menu which shows after clicking on coffee in the trading post of one of the islands. It allows to set passive trading options and minimum stock which can be very useful for trade routes.
To better control the trade routes and how many tons of goods get loaded from islands onto ships, you can set specific minimum stock for each good and each island individually. When a minimum stock is set, all ships on routes can load only that part of your stock which is above the minimum. The minimum amount has to always be left in the island's storage and ships on routes cannot cause the stock to drop below the minimum. For example, you have 120 tons of grain in an island's storage and there is a trade route which involves loading 50 tons of grain onto a ship. If the minimum stock for grain has been set to 100 tons, the ship can pick up only 20 tons of grain, leaving 100 tons of grain still in the storage. Despite the route's order to pick up 50 tons, the minimum stock setting limits this quantity, depending on the selected value and on the current state of the island's storage.
To set the minimum stock select the trading post of the island of your choice and then click on one of the goods. It opens the menu where you can set the minimum stock for that good, either by entering a specific value at the bottom, or by moving the slider with a lock symbol on the right side. The minimum stock setting will be applied only for the specific good on that particular island. To set the minimum stock for more goods on the same island or for the same good on other islands, you need to adjust the setting for each good and each island separately.
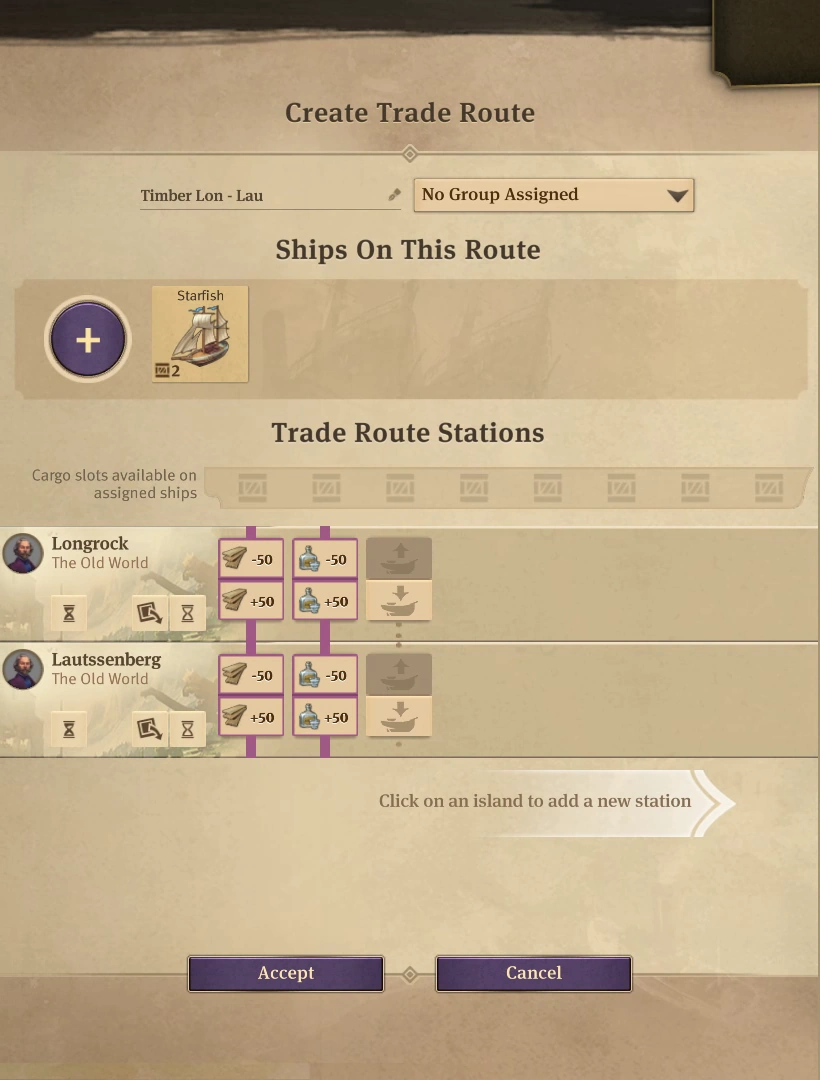

An example of a point to point route which goal is to evenly distribute timber and schnapps between two islands. Both involved islands need to have the minimum stock set for both timber and schnapps, and both goods are loaded and unloaded at each station.
It is possible to ensure an even distribution of goods between two or more islands by setting minimum stock on every island of the route and putting load and unload orders for the same good at every station. To illustrate this, let's consider an island with minimum stock set to 100, current stock is 80 and a ship equipped with 50 tons is approaching the island. Unload order makes the ship unload all 50 tons bringing island's stock up to 130 tons. But within the same station, the load order causes the ship to load 30 tons back, leaving the minimum stock of 100 tons in island's storage. Such a trick allows to maintain the stock around the level of the minimum stock setting while making sure that the ships still keep a portion of goods which can later be unloaded at the other stations of the route.
Trade route systems[]
There are various systems which your trade routes may be based on. Every system has specific situations when it is the most useful, each of them has advantages and disadvantages, your routes may also not follow any of the systems mentioned here at all. The trade network between your islands depends on where every branch of production is located and which islands produce or demand different goods.
Point to point[]
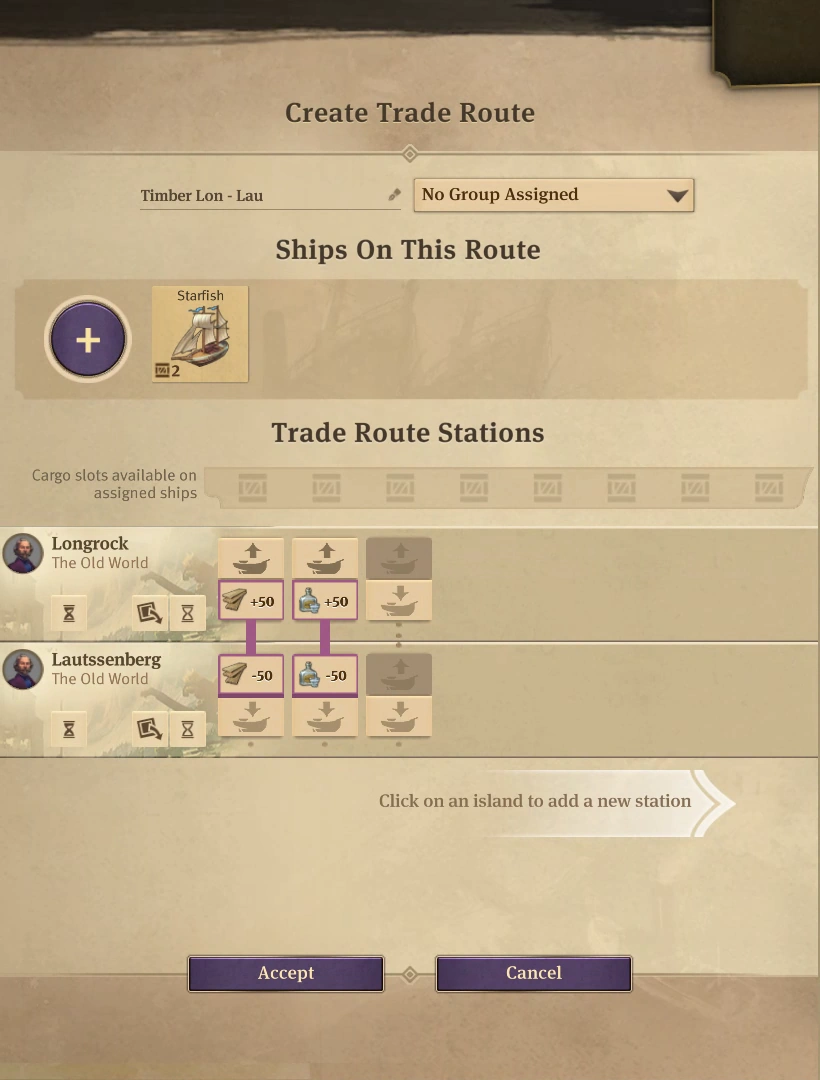

A simple point to point route transporting timber and schnapps from one island to another.
The most basic system known as point to point involves routes which transport goods from one island directly to another island where they are needed. For example, if island A produces schnapps for three other islands, such a system would consist of three separate routes: A->B, A->C, A->D, each route loading schnapps at island A and unloading schnapps at each of the destination islands. This system is easy to scale with increasing consumption, if island C starts requiring more goods, only route A->C has to be adjusted by increasing amount of loaded goods, improving route's ships or adding more ships to it etc. Because the routes are direct from the source to the destination, they are as short as possible and they ensure the shortest travel times for the ships.
The system may become problematic when many routes involve both the same islands and the same goods. If several islands produce the same good and several other islands require it, it is hard to establish a proper point to point system and to ensure every island receives necessary amount of goods. In such a case a lot of effort might be needed to adjust the ships and amounts of goods transported on each route, unless it is possible to pair up all the islands according to their production and consumption rates. However, it is the system to go to if such pairs can be easily created.
Circle routes[]
A circle route which loads timber and schnapps on one island and then distributes them across three different islands, the unload amounts have been adjusted.
Circle routes are based on transporting goods within several islands by going from one island to another in a single route, thus forming a circle route connecting all the involved islands. For example, islands A and B produce fried plantains which are needed on islands C and D. A circle route would connect all those islands in a circle: A->B->C->D, loading fried plantains at islands A and B, unloading them at islands C and D. Exact order of islands should depend on their placement in the world, they should be connected in such a way that the overall distance of the route is as short as possible. This system might be harder to scale with increasing production/consumption, and could create problems such as unloading all goods at island C and having nothing to unload at island D. To an extent it can be avoided by ensuring that each cargo slot is designated to unloading goods at a different island.
In some situations such a system is much easier to manage than point to point routes. It is the case especially when several islands produce the same good while several other islands consume it and it is impossible to pair them up for point to point system. A circle route can efficiently replace several point to point routes thus also making it easier to manage the overall list of trade routes. Circle routes are very useful for transporting goods of low consumption rates across all islands within one region.
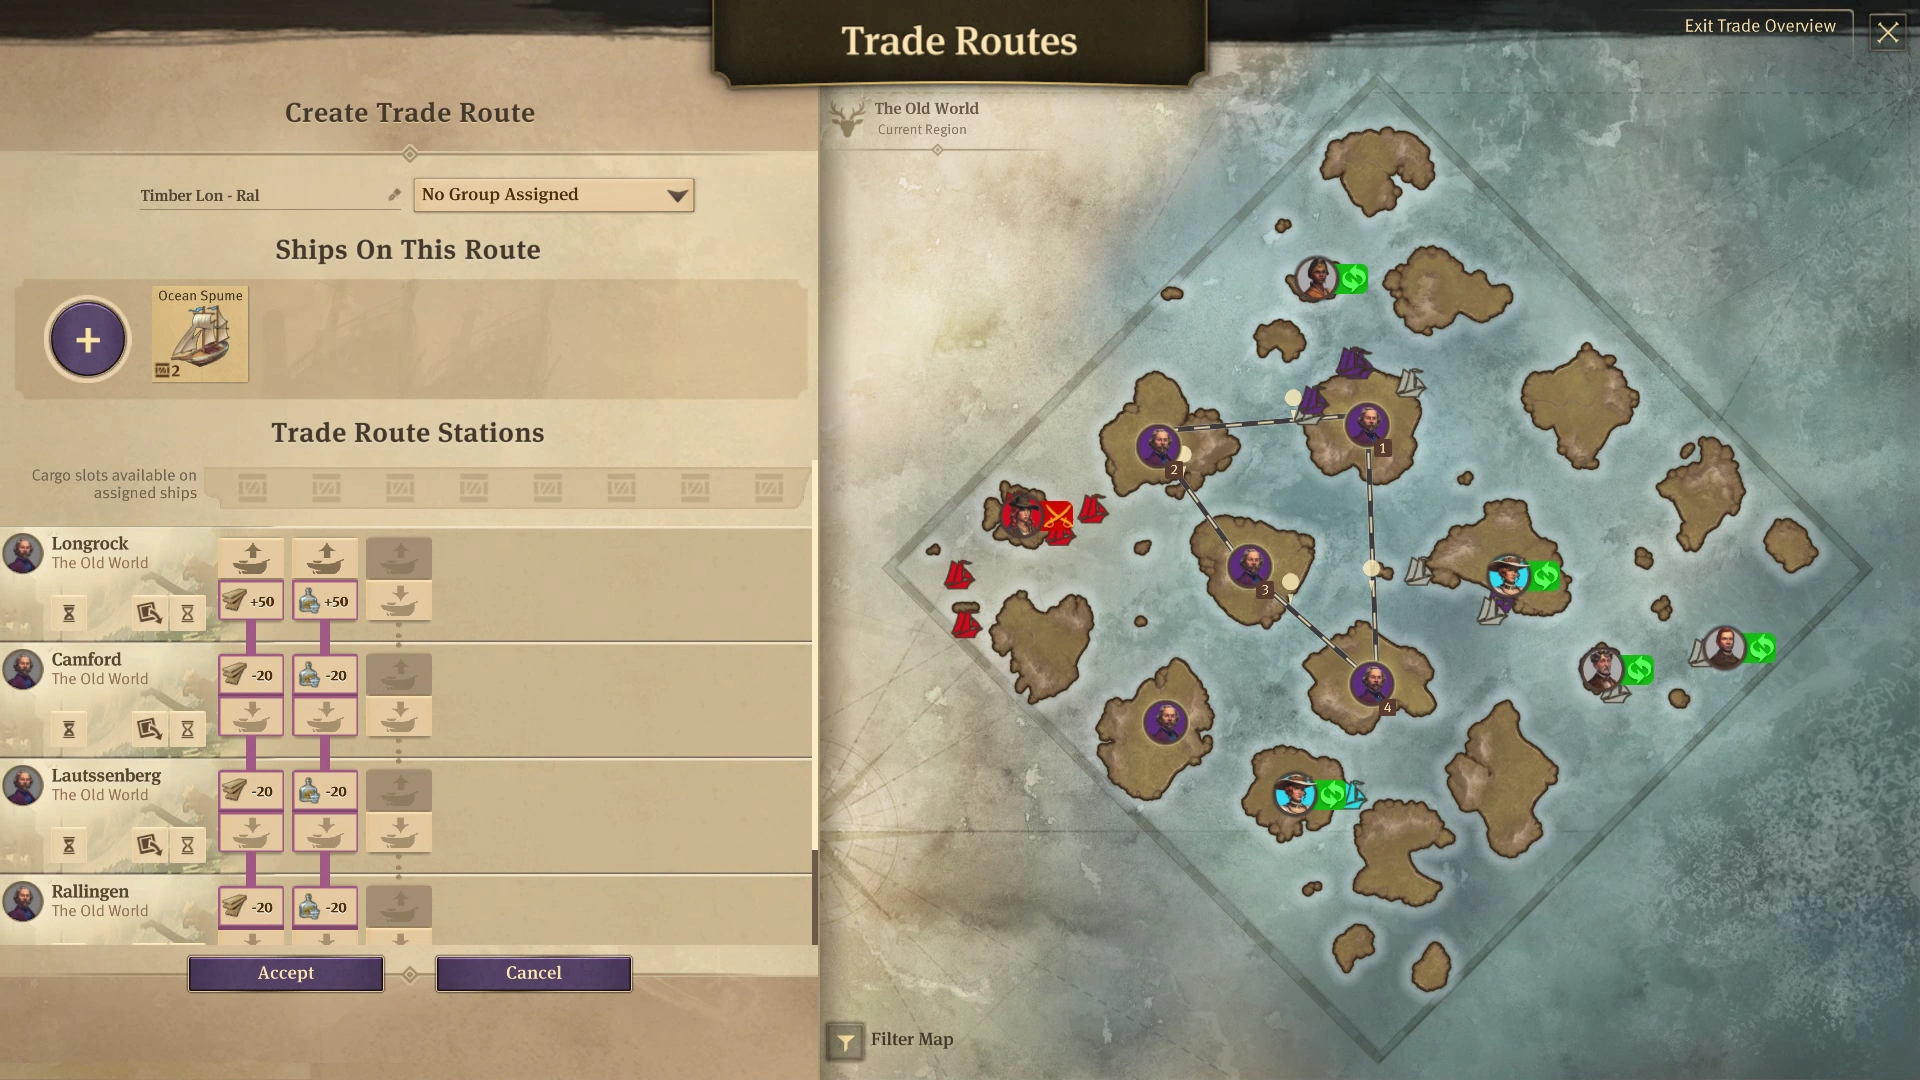
Hub and spoke[]


All four created trade routes create a single hub and spoke system, each route is a simple point to point route, loading goods at one island, unloading at the other. The island called Lautssenberg, which is the hub of the system, has been marked with a black circle on the map.
Hub and spoke system involves a central island acting as a hub and a series of secondary islands which when connected to the hub resemble spokes of a wheel. Some of the secondary islands produce goods which are transported to the hub island (which may produce or consume them too), and then from the central island transported to other islands where they are required. Transportation between secondary islands and the hub usually consists of direct point to point routes. For example, islands A and B produce steel which is needed on islands C and D. In the hub and spoke system, steel would be transported first from islands A and B to a hub island H, and from the hub island to islands C and D. It could be organised in a form of four point to point routes: A->H, B->H, H->C, H->D.
The main advantage of such a system is that it may sometimes be easier to organise than the most direct point to point routes. If production and consumption rates of each of the involved islands vary a lot from each other, a hub and spoke system is very easy to establish, as using one island as a hub nullifies those differences. This system shines the most in case of transporting goods between different regions, while setting a hub in one or both of the regions. Transporting goods from one region to a hub in another region, close to its edge, and then distributing goods from the hub to other islands within the region is a decent idea of how to handle interregional goods transportation.
Balancing act of a hub[]
The highest risk of a hub and spoke system is a single point of failure at the hub island. Because goods are essentially loaded/unloaded twice at those islands, they need an abundance of piers to handle all the arriving ships. It also creates the risk that if a disturbance occurs at the hub island, the entire system may come to a halt.
Secondary, the distances that goods have to travel are also longer than in case of a point to point system. It is important to consider the location of the island which you choose to act as the hub of your system, it needs to be in the centre in between of the destination and source island of your trade goods, to make the routes distances as efficient as possible.
When utilizing a trade hub and queues start to form at piers, consider splitting incoming and outgoing streams, by utilizing balloons for inbound traffic and ships for outbound traffic or vice versa. This way a resource will always be able to enter and leave the hub, even when using a chosen trade good on an advanced pier. By utilizing balloons on a hub, the amount of traffic that can be handled on a hub can be doubled.
Balancing a multi-hub strategy[]
When reaching high volume streams between the different regions, it can be a choice to have hubs at each separate region. Which will make it possible to consolidate voluminous trade streams between the hubs. The World-Class Reefer, which has introduced in Docklands, is a preferred choice when setting up a multi hub strategy between regions, due its high transversal speed of the ocean. When transport volumes rise above the loading capacity of reefers, consider the Great Eastern or Zephyr to even further optimise your interregional transport streams.
When creating a hub in the each region, it is possible to consolidate production in that region, ship out to population islands in the region from the hub and shuttle out the overproduction of trade goods towards sister hubs in other regions for usage by industries or population islands.
Load and unload settings on spokes[]
When having a multi hub strategy, it is a necessity to supress the amount of trade actions on the hubs, to accommodate the third interregional carriers mass shipping the goods to the demanding island in their destination regions. To accomplish a hub setup that is accommodating this, consider full load settings on regional ships traveling the spokes with small agile ships on a high frequency to guaranty deliveries and a low time occupancy on piers. While allowing interregional ships to pick up all extra stocks to be shipped overseas by roaming off all overproduction. This to guaranty interregional ships to be in constant motion without hindrance from local traffic.
Advanced multi hub considerations[]
When setting up a multi hub strategy and you have high volume good steams leaving the region with multiple drop destination going out form the sister hub, think Coffee for example. It is a good choice to split the in and outgoing volumes between balloons and ships, as mentioned above, Have the interregional routes ship in the Coffee with high volume balloons, which you can set on full unload on a dedicated advanced pier on the destination sister hub. Locally you can then ship the Coffee on high frequency routes with a normal steam ship, since they are more agile on regional spokes as reefers and will not interfere with mail transports on airship platforms.
This setup, combined with the local load and unload setup, will limit movement on the source hubs from the free loading ships when there is enough stock on the destination, creating lower pressure on the source regions hub, without a risk of a grid lock on the sister hub on the destination, due to the fact that the local drops are made by another modality as the interregional transport, the aforementioned split between balloons and ships.
Travel times between regions[]
Travel times measured for a cargo ship going in one direction from the edge of one region to the edge of the other region:
- Old World to New World
- Empty ship: 4-5 min
- Full ship: 5-6.5 min
- Cape Trelawney to Old World
- Empty ship: 3-4 min
- Full ship: 4-5 min
- Cape Trelawney to New World
- Empty ship: 4-5 min
- Full ship: 5-6.5 min
| |||||||||||||||||